主要代码流程图:

第1步:加载并启动ApplicationContext
1.1 概述
ApplicationContext顾名思义就是应用程序上下文的意思,作为整个应用程序的上下文,那么就应该包含应用程序主要功能,如bean创建、读取配置、消息国际化等。
源码中的注释是这样写的:Central interface to provide configuration for an application.This is read-only while the application is running, but may bereloaded if the implementation supports this。
Spring项目在启动的时候,会根据不同项目的需求,应用到一个ApplicationContext:
- 如果是springboot的SpringApplication.run方式来启动,则会更具项目的配置自动选用AnnotationConfigServletWebServerApplicationContext(基于注解配置的servlet项目)、AnnotationConfigReactiveWebServerApplicationContext(基于注解配置的webflux项目)或AnnotationConfigApplicationContext(基于注解配置的项目)
- 项目也可以直接用AnnotationConfigApplicationContext(XXX.class)这种方式来启动(基于注解配置的项目)
- 项目也可以直接用XmlWebApplicationContext(XXX.class)这种方式来启动(基于xml配置的项目)
不同ApplicationContext的读取配置、创建bean的方式可能有些差异,但是总的流程都是差不多的。
ApplicationContext的主要功能:
- 应该能够具备应用程序Bean的创建能力,因此ApplicationContext实现了BeanFactory接口
- 应该能够获取应用程序的环境配置信息,因此ApplicationContext实现了EnvironmentCapable接口,通过EnvironmentCapable接口的getEnvironment可以获取应用程序的配置信息,如果getProperty、getActiveProfiles等
- 应该具备配置国际化消息的能力,因此实现了MessageSource接口
- 应该具备应用程序事件通知的能力,因此ApplicationContext实现了ApplicationEventPublisher接口,如ContextRefreshedEvent表示应用程序的上下文刷新完成事件、ApplicationStartedEvent表示应用程序启动完成事件、ApplicationReadyEvent表示应用程序准备好了事件、ContextClosedEvent表示应用程序的上下文关闭事件。(当然我们也可以通过ApplicationEventPublisher接口实现应用程序自定义的事件,对于分布式的应用建议用分布式的事件框架,不用spring的事件框架。spring的事件框架只在当前进程有效,因此适合单进程的App)
- 应该具备资源扫描能力,因此ApplicationContext实现了ResourcePatternResolver接口,如Application在启动的时候需要扫描ComponentScan定义的package下的所有类,如果ComponentScan没有定义,则会默认扫描App配置类所在packge下的所有class类资源
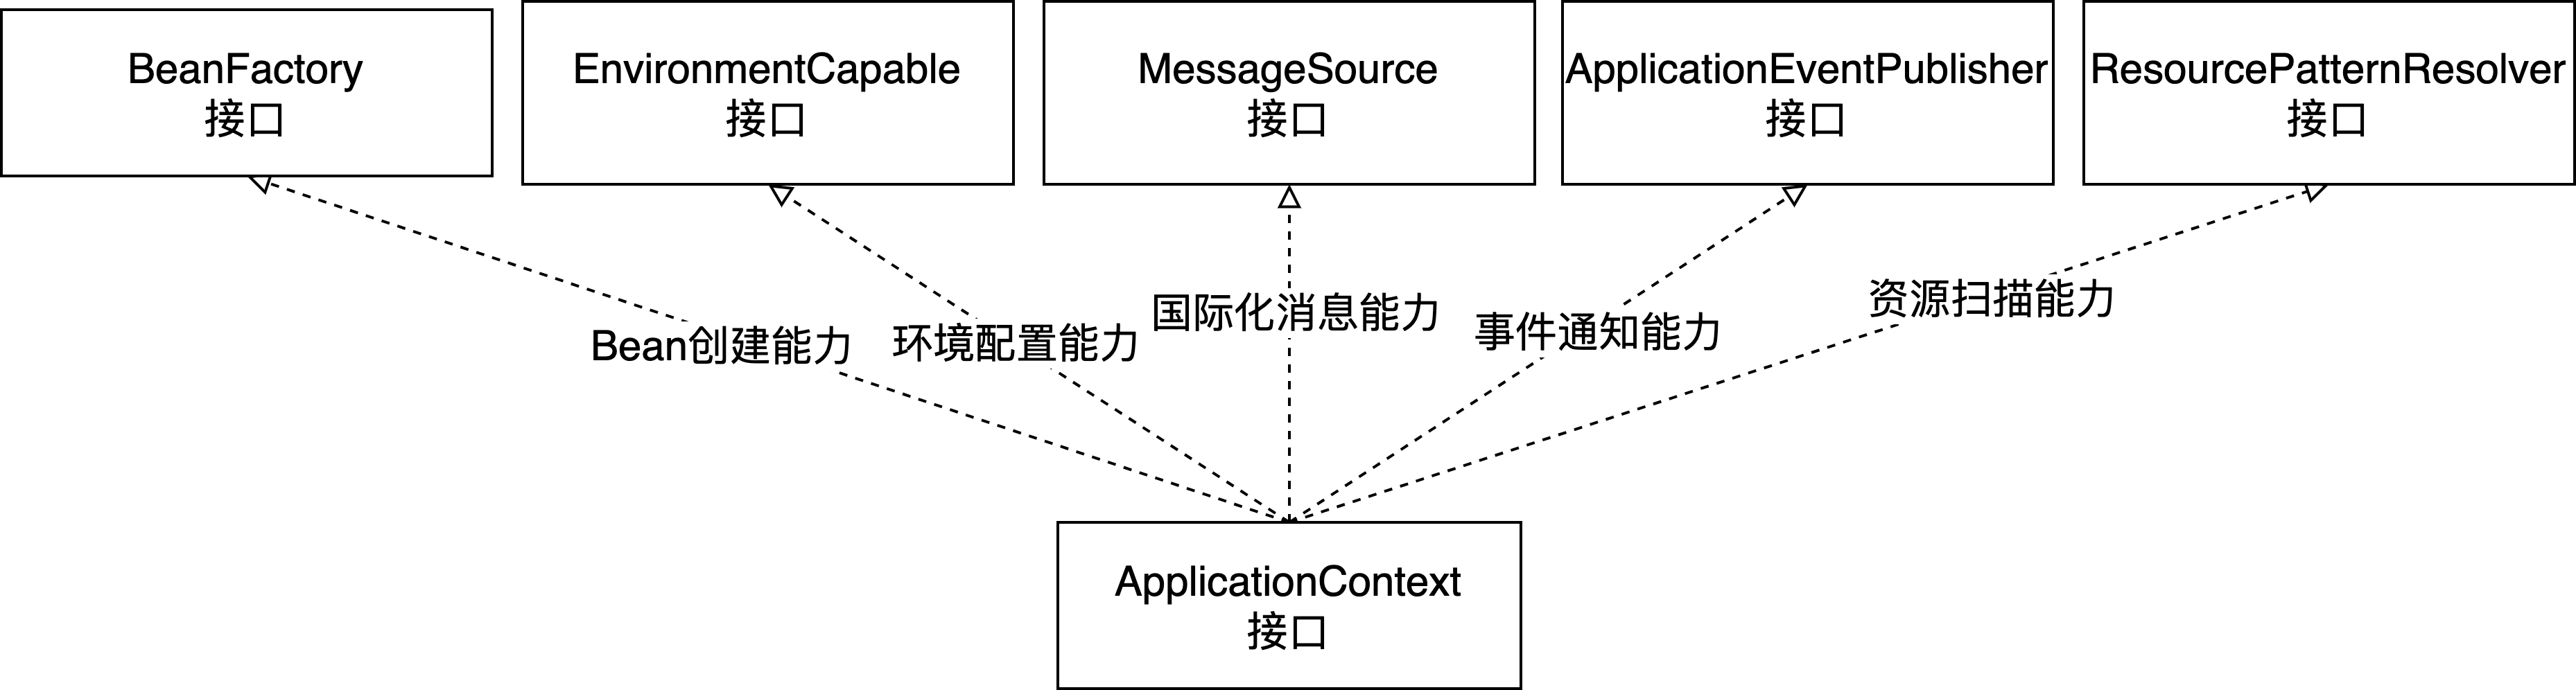
再回头来看看ApplicationContext类的定义可以印证:
public interface ApplicationContext extends EnvironmentCapable, ListableBeanFactory, HierarchicalBeanFactory,
        MessageSource, ApplicationEventPublisher, ResourcePatternResolver {
1.2 springboot用到的三个主要的ApplicationContext
AnnotationConfigServletWebServerApplicationContext、AnnotationConfigReactiveWebServerApplicationContext、和AnnotationConfigApplicationContext
顾名思义,这三个ApplicationContext都是基于注解配置(AnnotationConfig)的ApplicationContext。SpringApplication在启动的时候会根据webApplicationType来创建不同的ApplicationContext,ApplicationContextFactory的代码片段如下图所示:
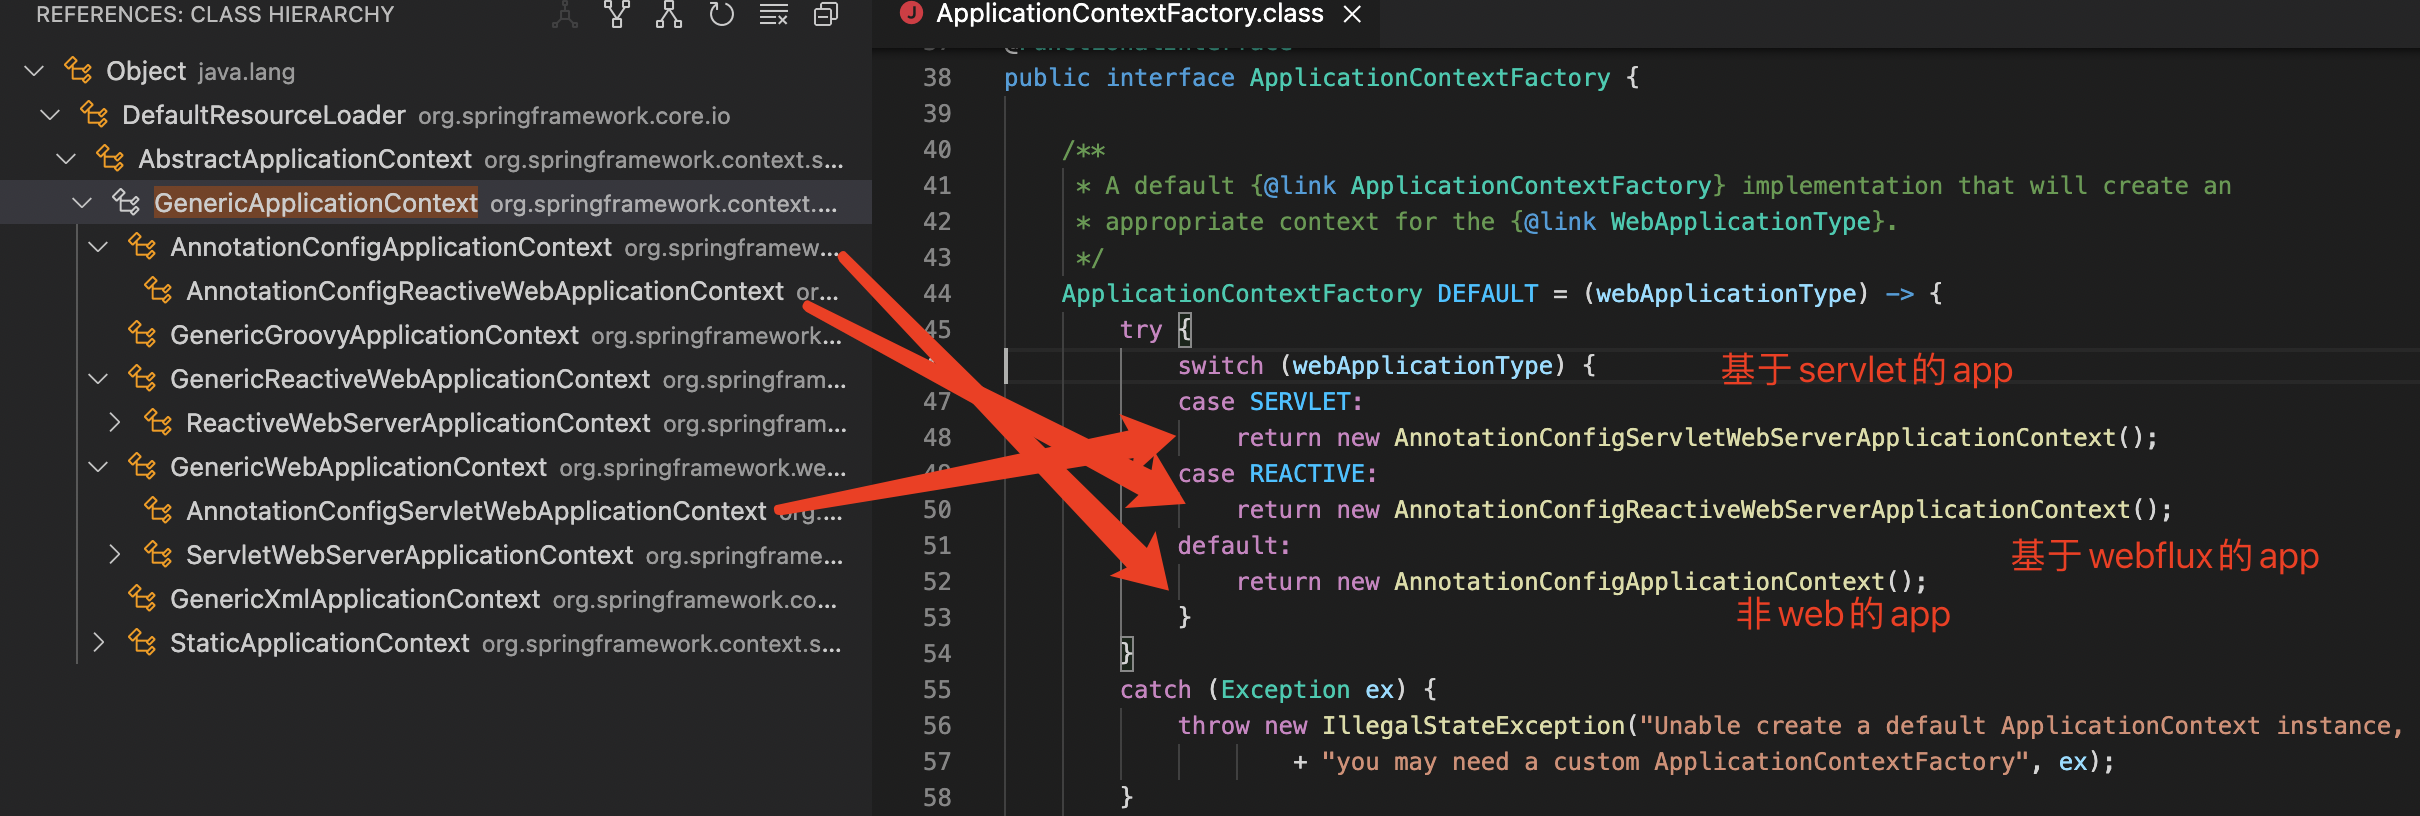
- 如果webApplicationType是SERVLET,则用AnnotationConfigServletWebServerApplicationContext
- 如果webApplicationType是REACTIVE,则用AnnotationConfigReactiveWebServerApplicationContext,启用WebFlux框架
- 否则,则用AnnotationConfigApplicationContext
Spring WebFlux 是 Spring Framework 5.0中引入的新的响应式web框架。与Spring MVC不同,它不需要Servlet API,是完全异步且非阻塞的,并且通过Reactor项目实现了Reactive Streams规范。
springboot的WebApplicationType类型配置:
-
我们的项目可以通过
application.yml中的spring.main.web-application-type来配置应用类型。 -
如果不配置,则根据以下代码逻辑决定应用类型:
public enum WebApplicationType {
    // ConfigurableWebApplicationContext在spring-web-x.x.x.jar包中
    // Servlet在tomcat-embed-core-x.x.x.jar或其它含servlet的jar包中
    private static final String[] SERVLET_INDICATOR_CLASSES = { "javax.servlet.Servlet",
            "org.springframework.web.context.ConfigurableWebApplicationContext" };
    // DispatcherServlet在spring-webmvc-x.x.x.jar包中
    private static final String WEBMVC_INDICATOR_CLASS = "org.springframework.web.servlet.DispatcherServlet";
    // DispatcherHandler在spring-webflux-x.x.x.jar包中
    private static final String WEBFLUX_INDICATOR_CLASS = "org.springframework.web.reactive.DispatcherHandler";
    // ServletContainer在jersey-container-servlet-core-x.x.jar包中
  private static final String JERSEY_INDICATOR_CLASS = "org.glassfish.jersey.servlet.ServletContainer";

  static WebApplicationType deduceFromClasspath() {
        if (ClassUtils.isPresent(WEBFLUX_INDICATOR_CLASS, null) && !ClassUtils.isPresent(WEBMVC_INDICATOR_CLASS, null)
                && !ClassUtils.isPresent(JERSEY_INDICATOR_CLASS, null)) {
            // 如果有spring-webflux的类,且无spring-webmvc,且无jersey-container的类
            // 那么久是REACTIVE的web类型
            return WebApplicationType.REACTIVE;
        }
        for (String className : SERVLET_INDICATOR_CLASSES) {
            if (!ClassUtils.isPresent(className, null)) {
                // 如果没有spring-web的类,且没有servlet的类,则是NONE类型,即非web项目
                return WebApplicationType.NONE;
            }
        }
        // 否则是SERVLET类型
        return WebApplicationType.SERVLET;
    }
  ...
通过以上代码,可以总结出以下规则:
- 如果项目引用了spring-boot-starter-webflux,没有引用spring-boot-starter-web和spring-boot-starter-jersey,则为REACTIVE类型
- 如果项目没有spring-web包和servlet相关的类,则项目默认为NONE类型
- 如果项目有spring-web包和servlet相关的类,则默认为SERVLET类型
通常情况下,我们的项目引用的是spring-boot-starter-web,因此默认就是SERVLET类型。
- 另外还可以通过以下方式设置WebApplicationType(不推荐)
SpringApplication application = new SpringApplication(xxx.class);
application.setWebApplicationType(WebApplicationType.xxx); //在这里设置WebApplicationType
ConfigurableApplicationContext context = application.run(args);
1.3 XmlWebApplicationContext
public class XmlWebApplicationContext extends AbstractRefreshableWebApplicationContext {

    public static final String DEFAULT_CONFIG_LOCATION = "/WEB-INF/applicationContext.xml";

    public static final String DEFAULT_CONFIG_LOCATION_PREFIX = "/WEB-INF/";

    public static final String DEFAULT_CONFIG_LOCATION_SUFFIX = ".xml";
用SpringBoot后,XmlWebApplicationContext就很少使用了。以前的老的项目还有一些用XmlWebApplicationContext的,spring的默认配置放在/WEB-INF/applicationContext.xml,通过加载xml配置来启动spring。
1.4 ApplicationContext主要代码
- AbstractApplicationContext的refresh方法:刷新应用程序的上下文,spring启动的主体流程可以通过这个方法看出来
@Override
    public void refresh() throws BeansException, IllegalStateException {
        synchronized (this.startupShutdownMonitor) {
            StartupStep contextRefresh = this.applicationStartup.start("spring.context.refresh");
            // 刷新前准备工作:创建environment并加载System.properties()及System.getenv()到environment中.
            prepareRefresh();
            // 创建BeanFactory.
            ConfigurableListableBeanFactory beanFactory = obtainFreshBeanFactory();
            // 为Bean工厂做准备,这里比较重要的就是整个了两个特殊的BeanPostProcessor
            // 1. ApplicationContextAwareProcessor:
            //    这个Processor用于执行Aware接口,如果我们写的Bean实现了如下Aware接口,将会执行该Aware接口的对应方法:
            //    EnvironmentAware、EmbeddedValueResolverAware、ResourceLoaderAware、ApplicationEventPublisherAware、MessageSourceAware、ApplicationContextAware
            // 2. ApplicationListenerDetector
            //    这个Processor是用于收集我们自己写的监听器,只要我们的Bean实现了ApplicationListener监听器,那么就会在初始化Bean期间调用postProcessMergedBeanDefinition方法时被收集到这个Bean中,在调用postProcessAfterInitialization注册为Spring的监听器
            prepareBeanFactory(beanFactory);
            try {
                // 扩展点,子类可以重写该方法,完成一些需要在BeanFactory创建后执行的操作
                postProcessBeanFactory(beanFactory);
                StartupStep beanPostProcess = this.applicationStartup.start("spring.context.beans.post-process");
                // 执行上一步的扩展
                invokeBeanFactoryPostProcessors(beanFactory);
                // 注册上所有的BeanPostProcessors,所有BeanPostProcessor类型的Bean会在此时完成实例化
                registerBeanPostProcessors(beanFactory);
                beanPostProcess.end();
                // 国际化
                initMessageSource();
                // 初始化事件广播器,当事件发布器发布事件时,会调用这个广播器来广播事件.
                // 广播器默认实现是SimpleApplicationEventMulticaster,这个监听器支持设置一个线程池来做异步处理
                // 我们还可以设置errorHandler来统一处理所有监听事件的异常。前提是我们要自己定义一个BeanId为applicationEventMulticaster的ApplicationEventMulticaster
                initApplicationEventMulticaster();
                // 扩展点,子类可以重写该方法,完成一些定制的功能
                onRefresh();
                // 注册监听器,我们写的监听器也会在这里加上.
                registerListeners();
                // ∆∆∆∆实例化所有余下的非lazy-init的单利bean。(这一步是重点,我们定义的bean基本上都是在这一步实例化的)
                finishBeanFactoryInitialization(beanFactory);
                // 在所有Bean加载完毕后,在容器中找beanId为lifecycleProcessor的LifecycleProcessor,找到则用找到的,没有找到值创建一个默认的DefaultLifecycleProcessor,然后就会执行这个LifecycleProcessor的onRefresh方法。在DefaultLifecycleProcessor执行onRefresh方法时,会去容器中找SmartLifecycle类型的Bean,并执行SmartLifecycle.start()方法,可以在此处扩展整个BeanFactory创建及初始化完成后的操作.
                // 发布一个ContextRefreshedEvent事件,SpringMVC就是基于这个事件扩展的
                finishRefresh();
            }
            catch (BeansException ex) {
                destroyBeans();
                cancelRefresh(ex);
                throw ex;
            }
            finally {
                resetCommonCaches();
                contextRefresh.end();
            }
        }
    }
- AbstractApplicationContext的finishBeanFactoryInitialization方法:实例化bean的主要方法的入口
    protected void finishBeanFactoryInitialization(ConfigurableListableBeanFactory beanFactory) {
        if (beanFactory.containsBean(CONVERSION_SERVICE_BEAN_NAME) &&
                beanFactory.isTypeMatch(CONVERSION_SERVICE_BEAN_NAME, ConversionService.class)) {
            beanFactory.setConversionService(
                    beanFactory.getBean(CONVERSION_SERVICE_BEAN_NAME, ConversionService.class));
        }
        if (!beanFactory.hasEmbeddedValueResolver()) {
            beanFactory.addEmbeddedValueResolver(strVal -> getEnvironment().resolvePlaceholders(strVal));
        }
        String[] weaverAwareNames = beanFactory.getBeanNamesForType(LoadTimeWeaverAware.class, false, false);
        for (String weaverAwareName : weaverAwareNames) {
            getBean(weaverAwareName);
        }
        beanFactory.setTempClassLoader(null);
        beanFactory.freezeConfiguration();
        // 调用beanFactory的实例化bean方法
        beanFactory.preInstantiateSingletons();
    }
第2步:通过BeanFactory创建bean
2.1 说明
顾名思义,BeanFactory是创建bean的工厂,它是IOC的主要接口,其中一个主要的子类就是AbstractAutowireCapableBeanFactory
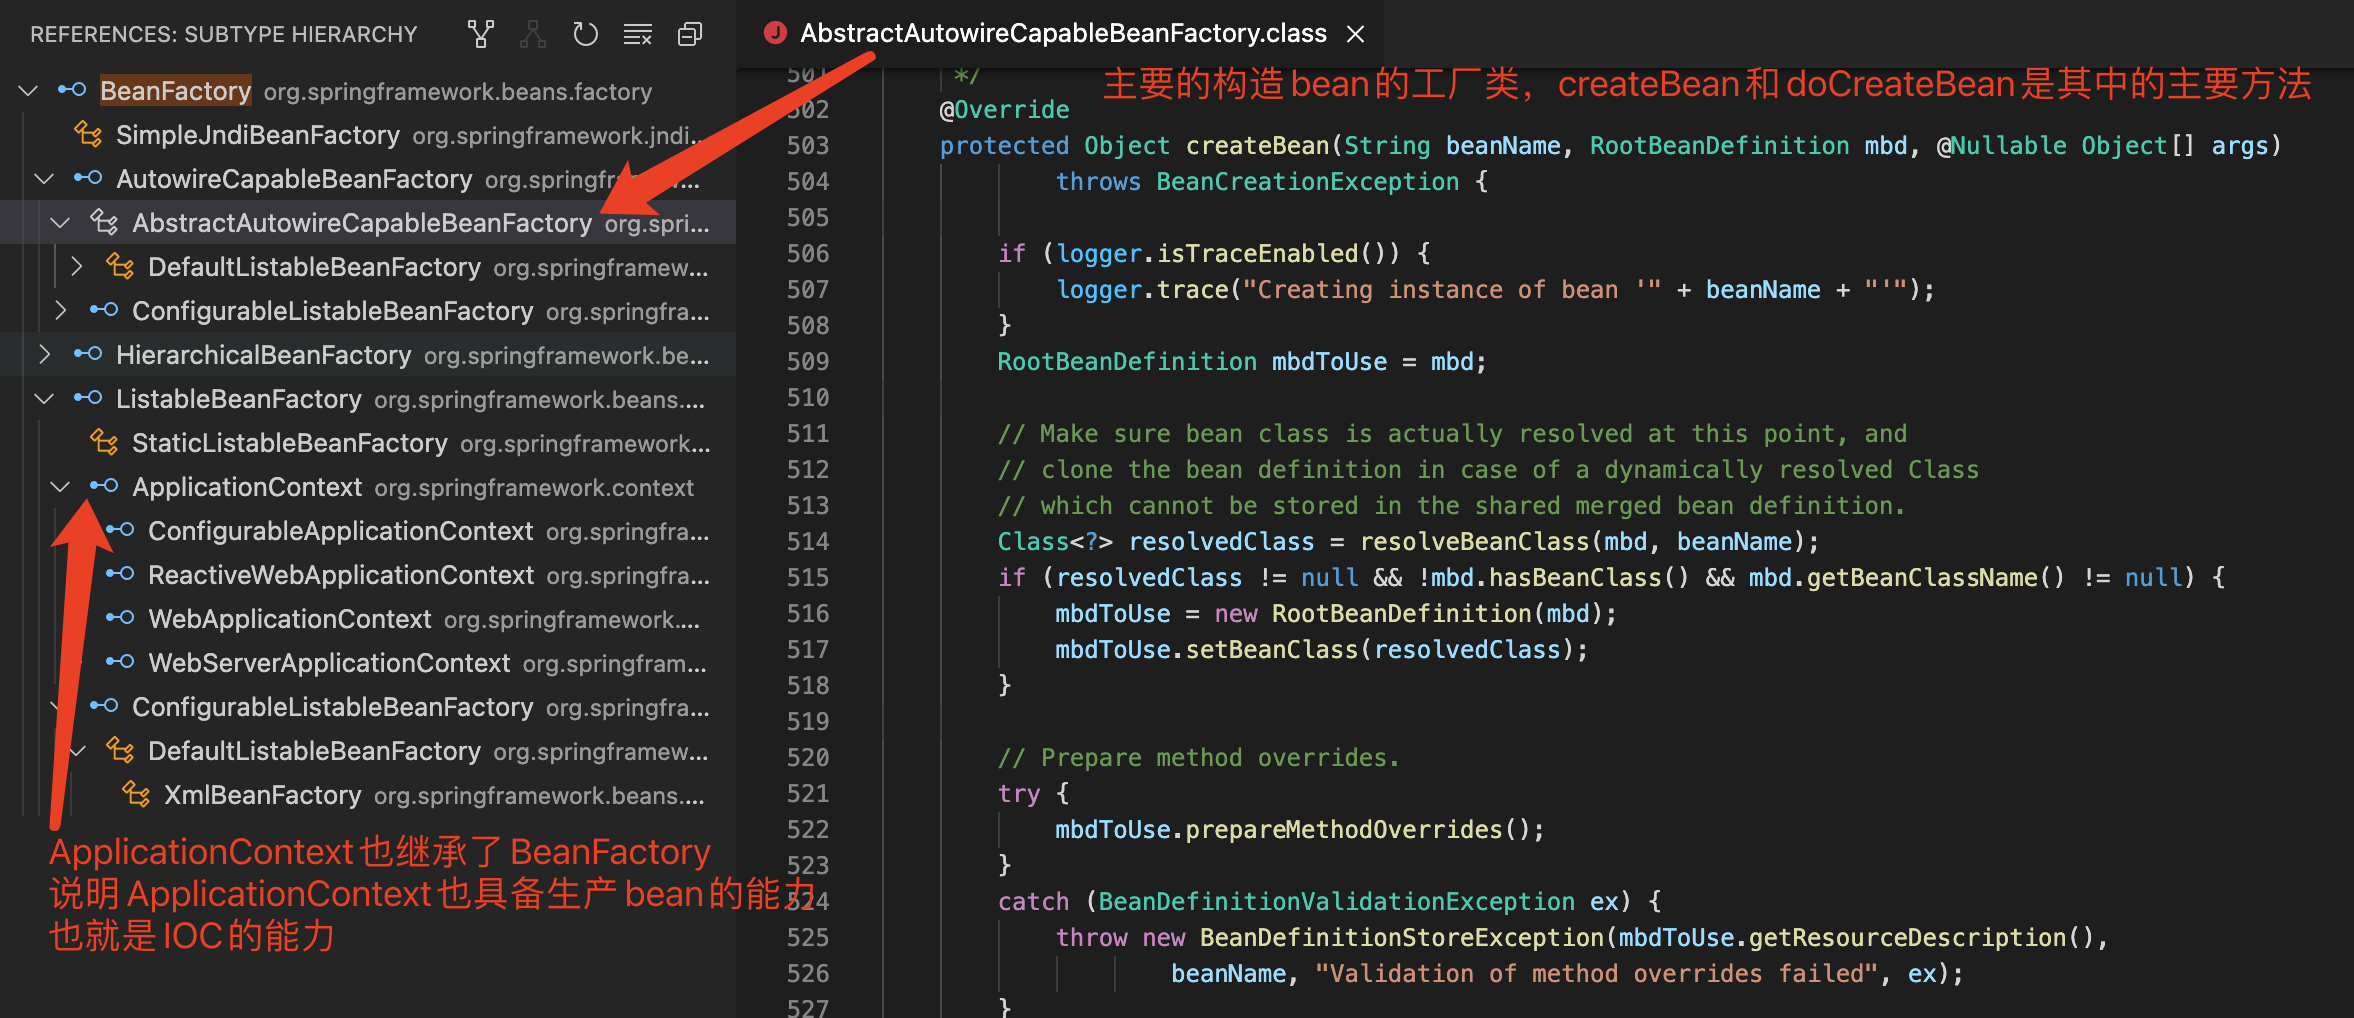
通过debug AbstractAutowireCapableBeanFactory的代码,可以看出spring创建bean的主要流程如下图:
- AbstractBeanFactory类的getMergedLocalBeanDefinition方法:准备RootBeanDefinition,RootBeanDefinition中定义了Bean的所有配置信息
- 创建bean的实例,也就调用bean的构造方法
- 继续合并BeanDefinition,查找bean中配置的@PostConstruct、@PreDestroy、@Resource、@Autowired 和 @Value等注解
- 处理bean方法Method中的@Autowired注入
- 处理bean属性Field中的@Autowired和@Value注入
- 调用@PostConstruct的方法
- 如果bean的类实现了InitializingBean接口,调用bean的afterPropertiesSet方法
- xml中配置了bean的init-method(不支持注解),调用配置的init-method
- 创建bean之后,如果需要创建AOP代理,则通过AnnotationAwareAspectJAutoProxyCreator来创建AOP代理。
2.2 AbstractAutowireCapableBeanFactory主要代码
AbstractAutowireCapableBeanFactory,顾名思义就是
具备自动化能力的Bean工厂类,不管是通过加载xml,还是基于注解来注入bean,都是用的这个抽象的自动化的bean工厂。
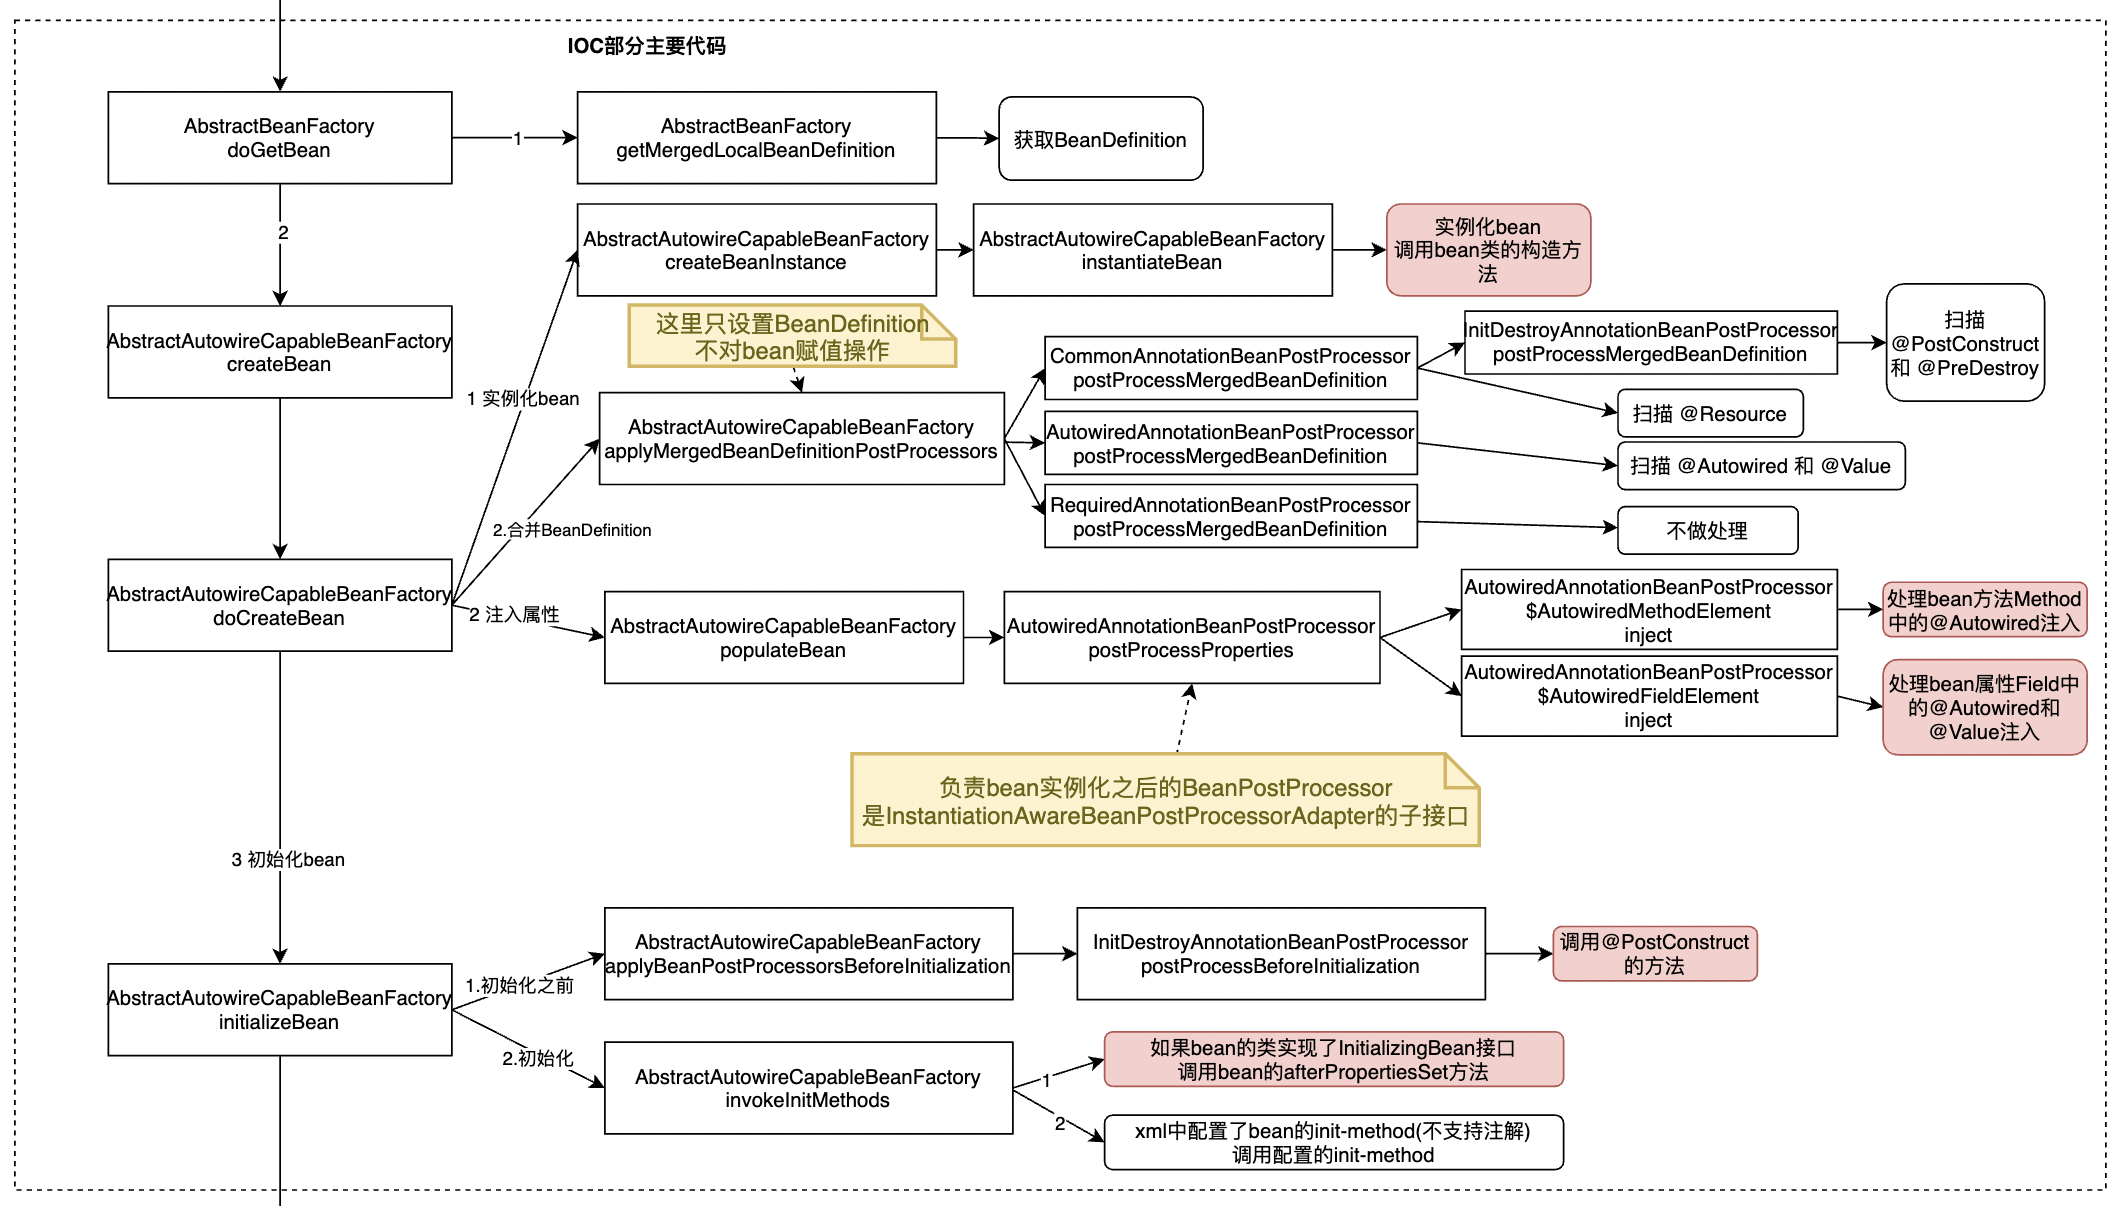
createBean调用了doCreateBean方法,主要的代码都在doCreateBean里面,doCreateBean的流程如下:
-
调用createBeanInstance方法创建bean实例,也就是调用bean类的构造方法
1.1调用instantiateBean方法
-
调用applyMergedBeanDefinitionPostProcessors方法,合并Beandefinition
2.1 调用CommonAnnotationBeanPostProcessor的postProcessMergedBeanDefinition方法,扫描@PostConstruct、@PreDestroy、@Resource注解,将扫描信息设置到Beandefinition
2.2 调用AutowiredAnnotationBeanPostProcessor的postProcessMergedBeanDefinition方法,扫描@Autowired 和 @Value注解,将扫描信息设置到Beandefinition
2.3 调用RequiredAnnotationBeanPostProcessor的postProcessMergedBeanDefinition方法,改方法步做处理
-
调用populateBean方法,注入bean的属性值
3.1 调用AutowiredAnnotationBeanPostProcessor的postProcessProperties方法
3.1.1 调用AutowiredAnnotationBeanPostProcessor$AutowiredMethodElement的inject方法,注入bean方法中@Autowired的值
3.1.2 调用AutowiredAnnotationBeanPostProcessor$AutowiredFieldElement的inject方法,注入bean属性中@Autowired和@Value的值
-
调用initializeBean方法,初始化bean,调用bean的初始化方法
4.1 调用applyBeanPostProcessorsBeforeInitialization方法,调用@PostConstruct的方法
4.2 调用invokeInitMethods方法;如果bean的类实现了InitializingBean接口,调用bean的afterPropertiesSet方法;xml中配置了bean的init-method(不支持注解),调用配置的init-method
4.3 调用applyBeanPostProcessorsAfterInitialization方法,做初始化之后的处理,比如创建AOP代理
4.3.1 调用AnnotationAwareAspectJAutoProxyCreator的postProcessAfterInitialization方法,创建AOP代理
    protected Object doCreateBean(String beanName, RootBeanDefinition mbd, @Nullable Object[] args)
            throws BeanCreationException {
        BeanWrapper instanceWrapper = null;
        if (mbd.isSingleton()) {
            instanceWrapper = this.factoryBeanInstanceCache.remove(beanName);
        }
        if (instanceWrapper == null) {
      // 创建bean实例,也就是调用bean类的构造方法
            instanceWrapper = createBeanInstance(beanName, mbd, args);
        }
        Object bean = instanceWrapper.getWrappedInstance();
        Class<?> beanType = instanceWrapper.getWrappedClass();
        if (beanType != NullBean.class) {
            mbd.resolvedTargetType = beanType;
        }
        synchronized (mbd.postProcessingLock) {
            if (!mbd.postProcessed) {
                try {
          // 合并Beandefinition,扫描@PostConstruct、@PreDestroy、@Resource、@Autowired 和 @Value注解,将扫描信息设置到Beandefinition
                    applyMergedBeanDefinitionPostProcessors(mbd, beanType, beanName);
                }
                catch (Throwable ex) {
                    throw new BeanCreationException(mbd.getResourceDescription(), beanName,
                            "Post-processing of merged bean definition failed", ex);
                }
                mbd.postProcessed = true;
            }
        }
        boolean earlySingletonExposure = (mbd.isSingleton() && this.allowCircularReferences &&
                isSingletonCurrentlyInCreation(beanName));
        if (earlySingletonExposure) {
            if (logger.isTraceEnabled()) {
                logger.trace("Eagerly caching bean '" + beanName +
                        "' to allow for resolving potential circular references");
            }
            addSingletonFactory(beanName, () -> getEarlyBeanReference(beanName, mbd, bean));
        }.
        Object exposedObject = bean;
        try {
            // 注入bean的属性值;1.注入bean方法中@Autowired的值;2.注入bean属性中@Autowired和@Value的值
            populateBean(beanName, mbd, instanceWrapper);
            // 初始化bean,调用bean的初始化方法
            // 1. 调用@PostConstruct的方法
            // 2. 如果bean的类实现了InitializingBean接口,调用bean的afterPropertiesSet方法
            // 3. xml中配置了bean的init-method(不支持注解),调用配置的init-method
            // 4. 调用applyBeanPostProcessorsAfterInitialization方法,做初始化之后的处理,比如创建AOP代理
            exposedObject = initializeBean(beanName, exposedObject, mbd);
        }
        catch (Throwable ex) {
            // 中间代码省略
        }
        // 中间代码省略
        return exposedObject;
    }
2.3 BeanDefinition接口说明
BeanDefinition:定义了Bean的所有配置信息,IOC构造bean的时候基于BeanDefinition来构造
2.4 BeanPostProcessor接口说明
BeanPostProcessor:bean实例化之前和之后的处理器,包含了两个接口
postProcessBeforeInitialization方法,负责处理bean实例化之前的回调
postProcessAfterInitialization方法,负责处理bean实例化之后的回调
几个主要的BeanPostProcessor:
-
AnnotationAwareAspectJAutoProxyCreator类: 负责创建AOP代理
-
MergedBeanDefinitionPostProcessor接口:负责合并BeanDefinition,包含的主要子类
- CommonAnnotationBeanPostProcessor负责扫描@PostConstruct @PreDestroy、和 @Resource注解
- AutowiredAnnotationBeanPostProcessor负责扫描@Autowired 和 @Value注解,它的AutowiredMethodElement子类负责处理bean方法Method中的@Autowired注入,子类负责处理bean属性Field中的@Autowired和@Value注入
2.5 解决bean循环依赖问题
通过三级缓存解决bean循环依赖问题。参考DefaultSingletonBeanRegistry类的getSingleton方法代码:
    protected Object getSingleton(String beanName, boolean allowEarlyReference) {
        Object singletonObject = this.singletonObjects.get(beanName);
        if (singletonObject == null && isSingletonCurrentlyInCreation(beanName)) {
            singletonObject = this.earlySingletonObjects.get(beanName);
            if (singletonObject == null && allowEarlyReference) {
                synchronized (this.singletonObjects) {
                    singletonObject = this.singletonObjects.get(beanName);
                    if (singletonObject == null) {
                        singletonObject = this.earlySingletonObjects.get(beanName);
                        if (singletonObject == null) {
                            ObjectFactory<?> singletonFactory = this.singletonFactories.get(beanName);
                            if (singletonFactory != null) {
                                singletonObject = singletonFactory.getObject();
                                this.earlySingletonObjects.put(beanName, singletonObject);
                                this.singletonFactories.remove(beanName);
                            }
                        }
                    }
                }
            }
        }
        return singletonObject;
    }
场景说明:
如果User依赖了Role,Role也依赖了User:
- 如果是构造方法循环依赖:死循环,只能改代码,无法解决,因为对象还没new出来
- 如果是set方法循环依赖:对象已经创建好,只是属性填充(DI)时遇到了循环依赖,spring能够解决
具体流程如下:
-
创建User对象
-
User对象实例化并将User对象的引用,提前暴露到三级缓存中,并且将User对象封装到一个ObjectFactory中
注意:objectFactory不克是可以获取User对象,还有可能是user对象产生的代理,也就是说返回的可能是原对象,也可能是代理工对象 三级缓存产生完对象之后,就会将产生出来的User对象(可能是原对象,也可能是代理对象)放入二级缓存
-
User对象依赖注入(setRole)
3.1 创建Role对象
3.2 Role对象实例化
3.3 依赖注入(setUser)
3.4 到二级缓存和三级缓存中去User对象
3.5 Role对象初始化
3.6 将Role对象放入一级缓存
-
User对象初始化
-
将User对象放入一级缓存
第3步:创建AOP代理
3.1 说明
创建AOP代码也是在AbstractAutowireCapableBeanFactory的doCreateBean方法中完成的。
属于initializeBean方法的最后一步之流程
创建AOP代理是在Bean的构造以及所有属性、初始化都之心完成后开始的。
流程图如下:
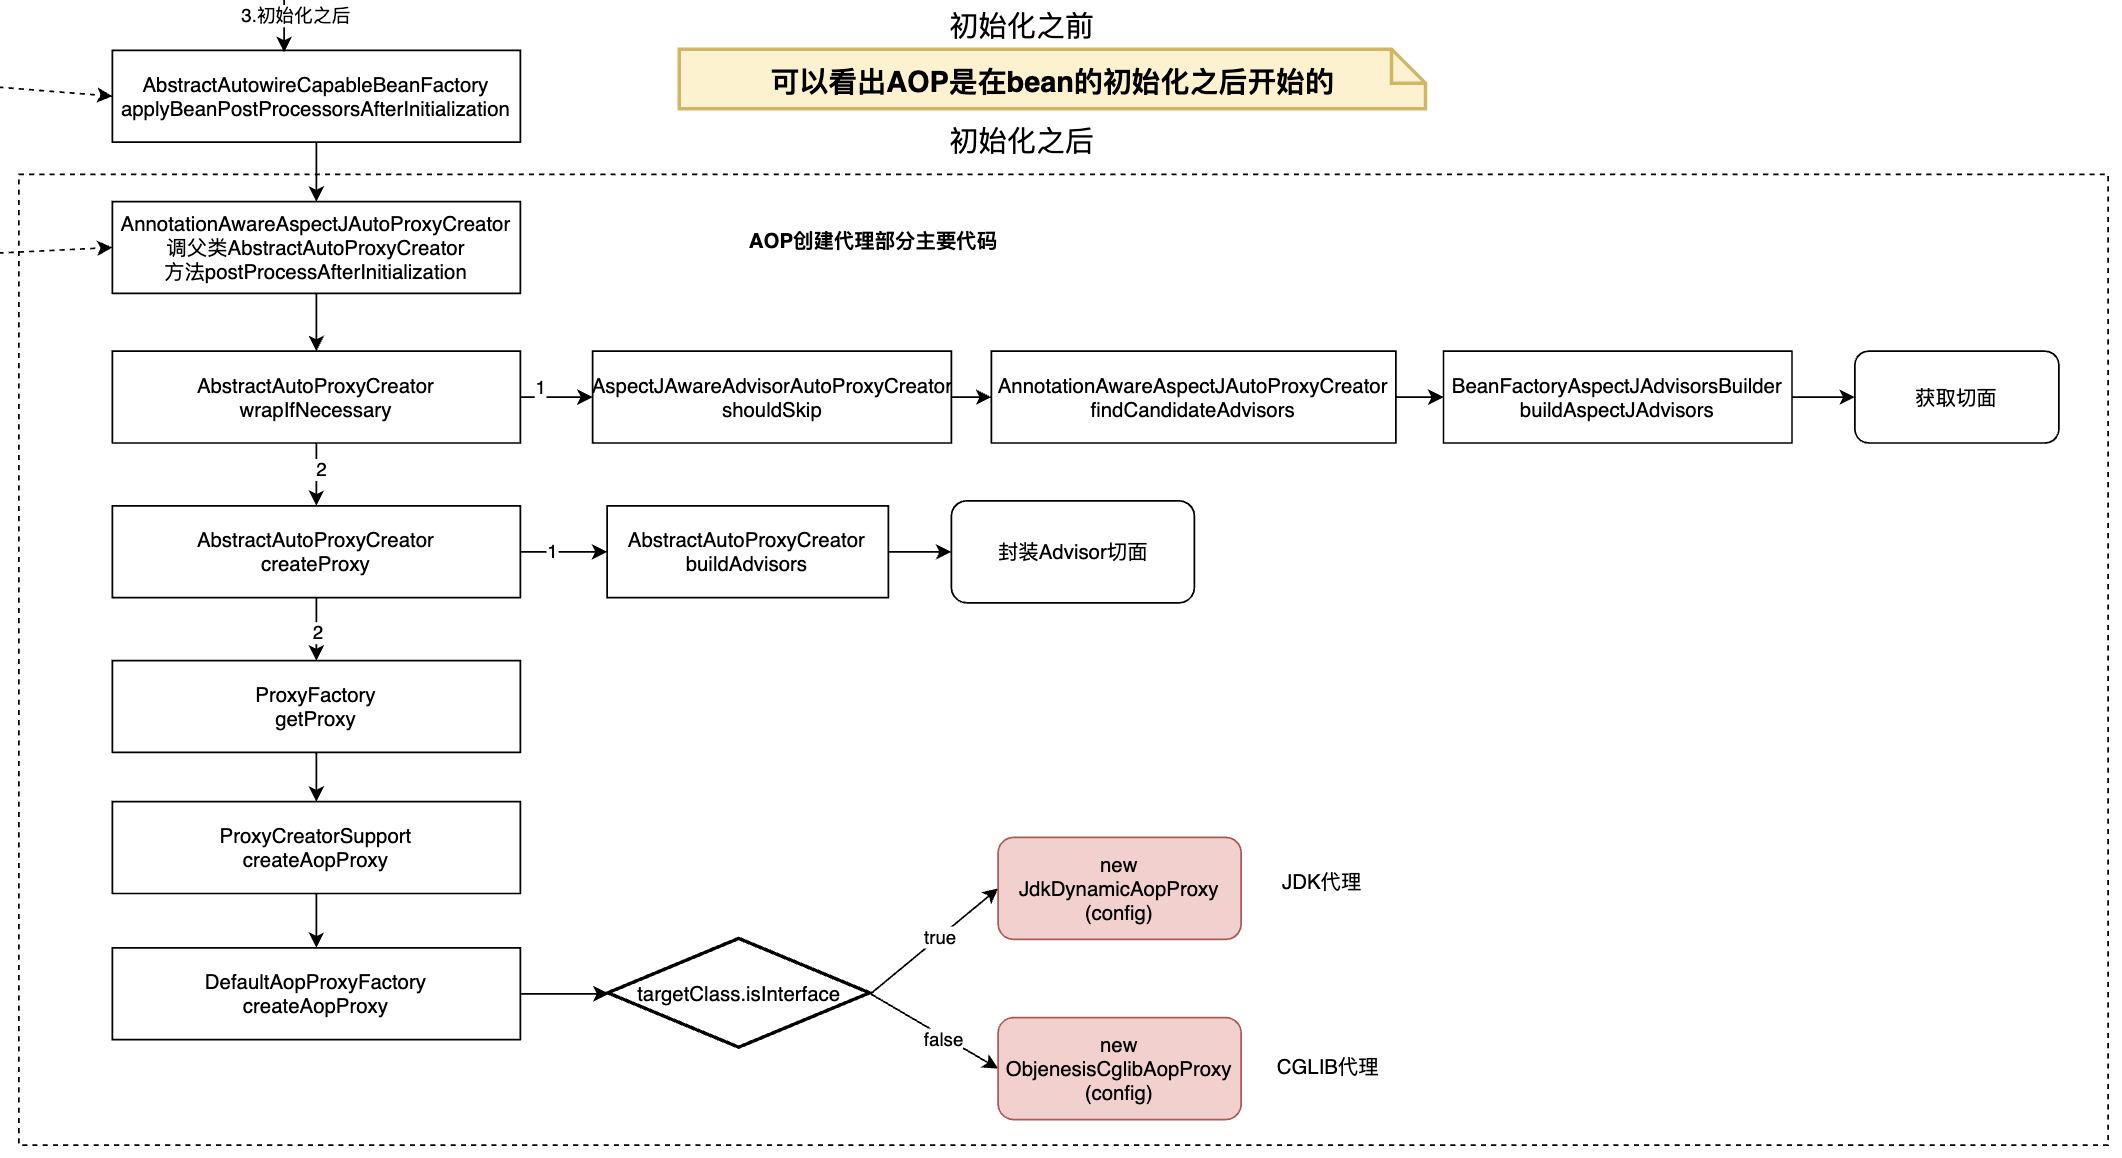
3.2 DefaultAopProxyFactory.createAopProxy代码
    public AopProxy createAopProxy(AdvisedSupport config) throws AopConfigException {
        if (!NativeDetector.inNativeImage() &&
                (config.isOptimize() || config.isProxyTargetClass() || hasNoUserSuppliedProxyInterfaces(config))) {
            Class<?> targetClass = config.getTargetClass();
            if (targetClass == null) {
                throw new AopConfigException("TargetSource cannot determine target class: " +
                        "Either an interface or a target is required for proxy creation.");
            }
            if (targetClass.isInterface() || Proxy.isProxyClass(targetClass)) {
                // 创建JDK代理
                return new JdkDynamicAopProxy(config);
            }
            // 创建CGLIB代理
            return new ObjenesisCglibAopProxy(config);
        }
        else {
            return new JdkDynamicAopProxy(config);
        }
    }
3.3 主要概念
Join point(连接点):目标对象中的方法就是一个连接点,也就是aop拦截的具体的某一个方法。因为Spring只支持方法类型的连接点,所以在Spring中连接点指的就是被拦截到的方法,实际上连接点还可以是字段或者构造器。
Pointcut(切入点):用来定义怎么切入到连接点的,只是一个定义。比如@Pointcut("execution(* olivee.study.IWorker.work(..))")这个切点表示切入olivee.study.IWorker.work方法点执行
Advice(通知):AOP在特定的切入点上执行的增强处理,有before(前置),after(后置),afterReturning(最终),afterThrowing(异常),around(环绕)
Aspect(切面):包括切点pointcut,通知Advice的一个载体。在spring AOP中可以用一个注解了@Aspect的类来定义。
Target object(目标对象):原始对象,代理前的对象
AOP proxy(代理对象):代理后的对象
- Advice通知类型介绍
- Before:在目标方法被调用之前做增强处理,@Before只需要指定切入点表达式即可
- AfterReturning:在目标方法正常完成后做增强,@AfterReturning除了指定切入点表达式后,还可以指定一个返回值形参名returning,代表目标方法的返回值
- AfterThrowing:主要用来处理程序中未处理的异常,@AfterThrowing除了指定切入点表达式后,还可以指定一个throwing的返回值形参名,可以通过该形参名来访问目标方法中所抛出的异常对象
- After:在目标方法完成之后做增强,无论目标方法时候成功完成。@After可以指定一个切入点表达式
- Around:环绕通知,在目标方法完成前后做增强处理,环绕通知是最重要的通知类型,像事务,日志等都是环绕通知,注意编程中核心是一个ProceedingJoinPoint
图例:


3.4 AbstractAspectJAdvice的几个子类
- AspectJAfterAdvice:负责处理After通知
- AspectJAfterReturningAdvice:负责处理AfterReturning通知
- AspectJAfterThrowingAdvice:负责处理AfterThrowing通知
- AspectJAroundAdvice:负责处理Around通知
AspectJMethodBeforeAdvice:负责处理Before通知
3.5 主要的类
- Interceptor:拦截器,Advice的子接口,标记拦截器。拦截器是增强器的一种。
- Methodinterceptor:方法拦截器,Interceptor的子接口,拦截方法并处理。
- Joinpoint:连接点。在拦截器中使用,封装了原方法调用的相关信息,如参数、原对象信息,以及直接调用原方法的proceed方法
- Invocation:Joinpoint的子类,添加了获取调用参数方法。
- Methodinvocation:Invocation的子类,包含了获取调用方法的方法。
- AbstractAspectJAdvice:负责处理通知的抽象类
- AspectJAfterAdvice:负责处理After通知
- AspectJAfterReturningAdvice:负责处理AfterReturning通知
- AspectJAfterThrowingAdvice:负责处理AfterThrowing通知
- AspectJAroundAdvice:负责处理Around通知
- AspectJMethodBeforeAdvice:负责处理Before通知